Ric Rac Lover's Tic-Tac-Toe {Free Downloadable Pattern}
I'm deeeelighted to unveil a downloadable pattern here at the Snipper! Would you like to whip up some super cute and totally fun tic-tac-toe boards with me?


7. Sew down your bias tape. I used a straight stitch and I'm sure you are all fully capable of doing the same, but if you are really hesitant, feel free to use a zig zag stitch instead.


Now I know what you are thinking -- Liz that's very nice and all, but I don't have that fabric. No worries!!! Any type of fabric with pictures that measure about an inch in diameter will do. This could totally be a boy gift with the right fabric. And stash sewers might even consider just cutting out two different shapes (or two different colors). Noses and ears maybe? Circles and triangles? Hot dogs and...

...you get the idea.
So! Now that you are all on board *pun intended,* let's jump in.
Get the pattern and basic instruction sheet here: PATTERN DOWNLOAD {This is a PDF file.}
PLEASE NOTE! If you would like your game to have a pocket to hold the game pieces, I've included bonus instructions at the end of this post. I almost didn't include these instructions because I didn't want to confuse anyone, but the pocket is awesome and I couldn't help myself! So if you want a pocket, read all of the way through to the end before you begin.
Let's get started!
You will need:
- ric rac or ribbon: 26 inches total
- felt: a 9 x 12 sheet will do
- fabric: enough for one 6.5 x 6.5 inch square and 10 game pieces (two squares if you want a pocket)
- double fold bias tape: 27.5(ish) inches
1. Cut the following:
- 4 pieces of ric rac 6.5 inches long each
- 1 square of felt (use pattern)
- 1 square of fabric (use pattern) (two squares if you want a pocket)
- 1 piece of double fold bias tape about 27.5 inches long

2. Next, mark the felt so that you know where to sew the ric rac lines. You can put a little mark on the ends of the guidelines and maybe in the middle of each line. I used a fabric marker.

3. Sew the ric rac with a straight stitch. (And ignore my browning ironing board -- it is clean, I promise!)


4. If your ric rac hangs off, trim it flush to the edge.

5. After your ric rac is on, put your felt and fabric squares on top of each other -- wrong sides together. (If you are making a pocket, go to those instructions at the end of this post before moving on to the next step)

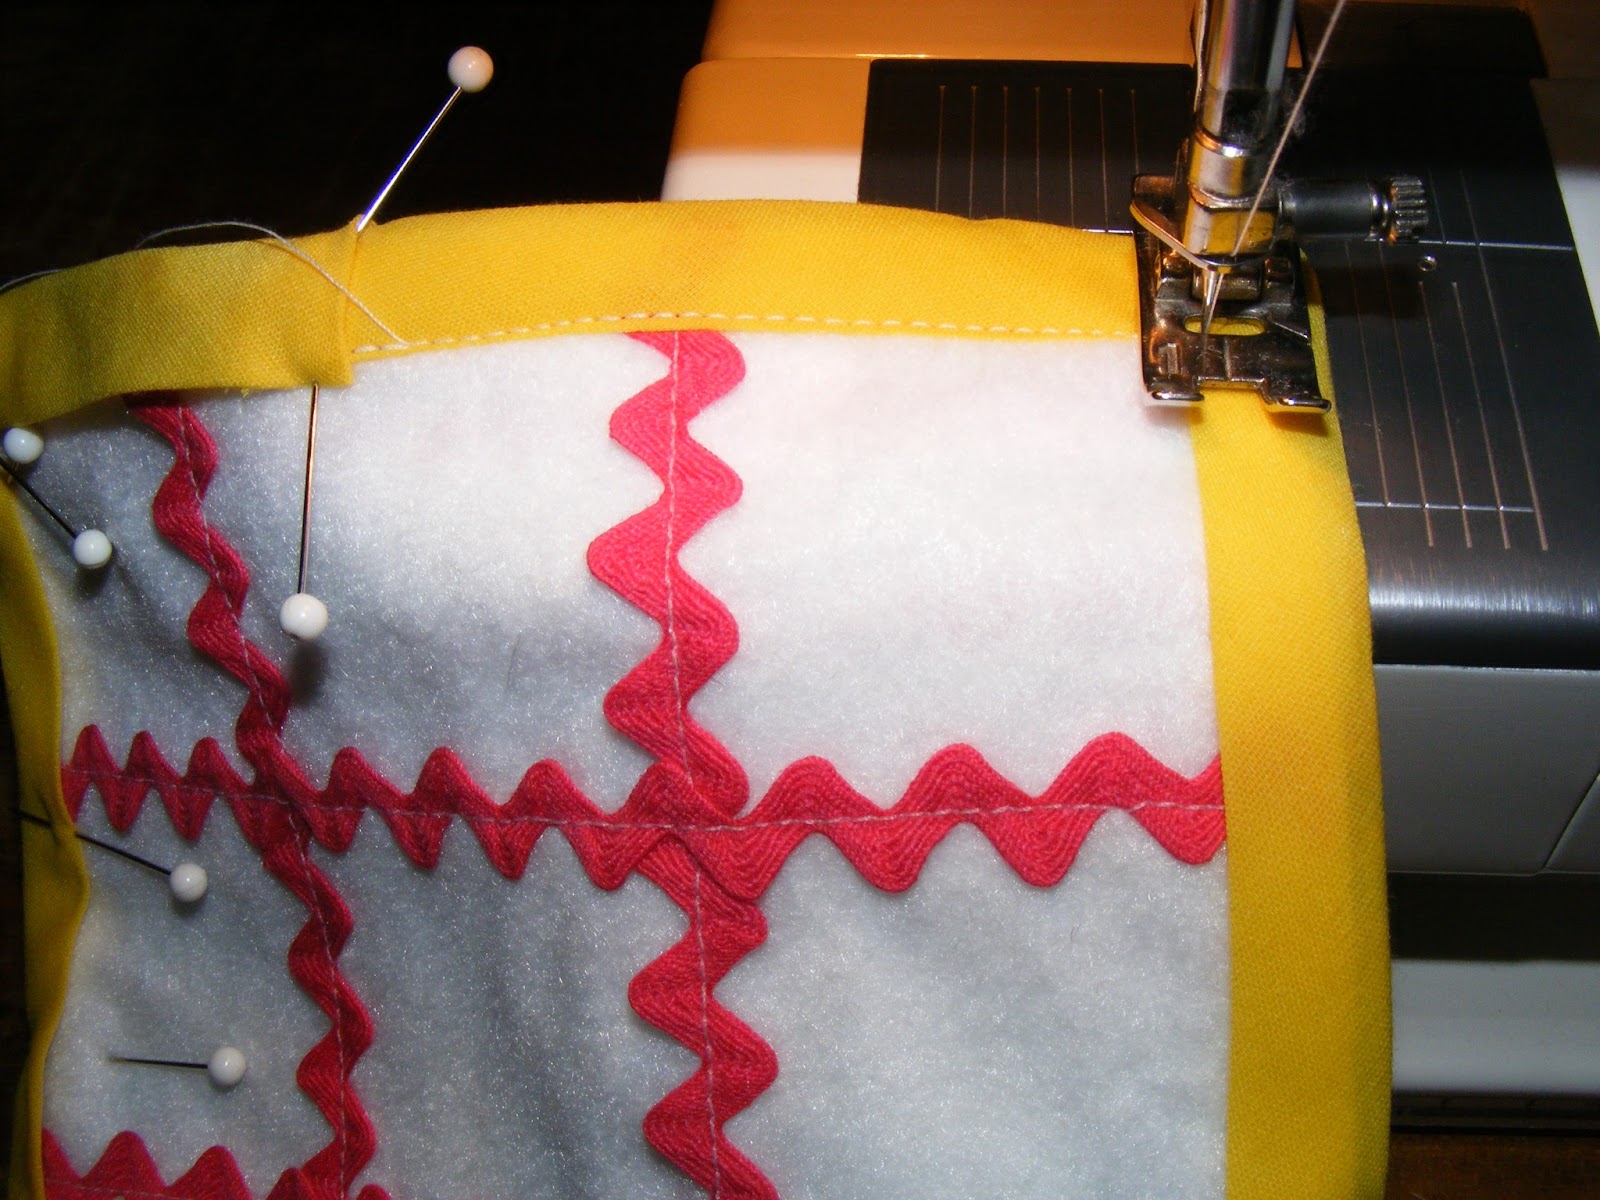
Get out your bias tape and your pins and psych yourself up for the hard part -- putting the bias tape on. Here's a pic to remind you what we're going to do.

6. Pin the bias tape all of the way around the square. The key to attaching the bias tape is to pin it really, really, really well! Remember that you are going to overlap your ends, so start before the middle on one side and work your way around.

Quick tip for those not familiar with bias tape: One side of the bias tape is wider than the other. The wider side is the backside and it goes underneath.
Miter the ends as best you can. I just pinned through the bias tape on the corners and not into the felt.

You can make a more pointy corners like this or a more rounded corners like this pink one.
I pinned in a few places on the backside as well.
I pinned in a few places on the backside as well.
Pinning the bias tape is the longest part of the whole she-bang, but if you do a great job on the pinning, you are good to go. Seriously, you're golden. Hang in there. My one-year-old sewing buddy thinks you're doing great and that his mother should give him the camera.

Where were we?
To end, fold over the last bit of the bias tape and pin it down. If you have too much extra tape, feel free to trim it.
To end, fold over the last bit of the bias tape and pin it down. If you have too much extra tape, feel free to trim it.


7. Sew down your bias tape. I used a straight stitch and I'm sure you are all fully capable of doing the same, but if you are really hesitant, feel free to use a zig zag stitch instead.
I took the pins out as I went along. You will definitely want to look at the back every once in a while as you sew to make sure everything is a-okay back there. When you are done, give it slight press -- not too hot or you'll melt the felt. My bias turned out a bit lumpy in spots. I think I need more practice!


Now that the board is ready, it's time to work on the game pieces.

8. Cut out your fabric pictures or shapes. You will need five for each player, ten altogether.
My fabric pictures were about an inch in diameter and I left about an eighth of an inch of fabric around the edges, so the finished pieces were about 1.25 inches in diameter.


9. Attach each game piece to a piece of felt.


5.c. Put the pocket on top of the other fabric square. I rotated the design.


Your finished tic-tac-toe board will have a backside that looks like this:

Totally worth the extra two minutes, right?
~~~~~~~~~~~~~~~~
Please let me know if you have any problems with the instructions and I'll make corrections as needed. This is my first downloadable pattern and I'm learning the ropes. If all goes well, I hope to make this sort of thing a regular occurrence here at the Snipper.
Happy sewing to you, dear friends! ~ Liz
p.s. I haven't forgotten about the giveaway! I'll be back soon to announce the winner :)


Ta Da!!! How did you do?


Time to play!

~~~~~~~~~~~
Bonus instructions: How to add a pocket.
5.a. To make the pocket, cut one more square of fabric.

5.b. Turn the square over about 1.25" and seam it.


5.d. Put the fabric and pocket on top of the felt and head back to step 6 (attaching the bias tape) in the basic instructions.


Totally worth the extra two minutes, right?
~~~~~~~~~~~~~~~~
Please let me know if you have any problems with the instructions and I'll make corrections as needed. This is my first downloadable pattern and I'm learning the ropes. If all goes well, I hope to make this sort of thing a regular occurrence here at the Snipper.
Happy sewing to you, dear friends! ~ Liz
p.s. I haven't forgotten about the giveaway! I'll be back soon to announce the winner :)


Yay! I'm so glad you posted this pattern! I am definitely going to make it for Abigail when she is older - such a good idea!
ReplyDeleteGlad you like it! My Z is still on the young side for it, but Roo is at the perfect stage for games like this. We love it!
Delete