How to Make a Child's Sash With 1/2 Yard of Fabric
I had been meaning to throw up a quick post on how to put together a three-piece sash for a child's dress.
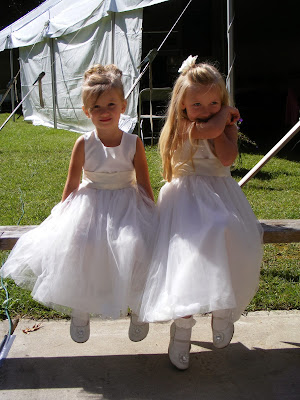


In order to make a child's sash like the ones pictured here, you need 1/2 yard of fabric at least 44/45 inches wide. The finished sash has a 2.5 inch band across the front and 4 inch wide ties.
1) The first thing you need to do is measure the width of the front of the dress from seam to seam and add one inch for 0.5 inch seam allowances. (On this dress, width of front waist = 12.75 inches + 1 inch seam allowance = 13.75 inches)

You want to measure across the dress at the spot where the top of the sash will be -- approximately 2.5 inches above the waist seam.
2) Cut the fabric. There are three pieces. (The width of the front waist is the measurement you got in step 1.)

These measurements will work up to about a child's size 5. I found that 22 inches is the minimum tie length needed to make a good bow. Larger sizes will need longer tie pieces!
3) After cutting, take the tie pieces (9 x 22.5 inches) one at a time. Fold the first piece in half.
I used some pins to hold it in place since the fabric is slippery -- the side with the two pins is the folded side.

4) Take a ruler and cut the end of the tie on an angle. Make sure the fold is on the long side.


4) Do the same thing with the other tie piece. Make sure the angle is the same.
Once you take out the pins and open them up, each tie piece will look like this:

5) Before sewing, fold over each tie piece and pin it along the long open side, down to the point. It's hard to tell in the picture, but pin and sew on the wrong side of the fabric. (You'll turn it right side out in Step 8.)

6) Using 1/2 inch seams, sew along the long side of each tie all of the way down to the point. Leave the short end of the ties open. (Sorry, I forgot to take a picture of the open end of the tie.)

7) Trim the corners and the points.


8) Turn the ties right side out.


I used this little tool (I believe it's called a point turner) to turn the corners, but you can (carefully!) use something else -- a knitting needle works pretty well.

9) Press.

10) Clean up the other side of the ties if they need it.


11) Take the front piece of fabric.

12) On either side of this piece, make two marks on the right side of the fabric. This piece is 6 inches wide, so make a mark at 3 inches and at 1/2 inches.


13) Pin the ties to the front piece -- just inside of the marks. First pin the outside of the tie, then pinch the fabric and pin the inside.


14) Baste the ties.

15) Pin each side like this. (It will make sense in a moment.)

16) Fold the top half of the front piece over the bottom half and pin it in place, matching the sides and corners. The ties can hang out right in the center front.

17) Sew around the pinned edges, leaving a space open in the middle about 6 inches wide (where the ties hang out). It is VERY important that you only catch the tie pieces in the end seams! That's why we pinned the tie out of the way in step 15.

18) Clip the corners.

19) Pull on the ties to turn the whole thing right side out.


20) Sew the opening shut. I used a whipstitch.

Phew! Can you believe something so seemingly simple takes twenty steps?

I tacked the sashes down at the side seams (at the top edge of the sash, not the bottom) and in the center front in a place where the stitches wouldn't show.


My models wore size 4 and size 6 dresses.
Let me know if you have any questions about the process! ~ Liz

Thank you so much for this tutorial! I managed to follow it very easily and added a sash to my daughters dress for a wedding!
ReplyDeleteNice pic.
ReplyDeleteYour blog is very useful. Thank you so much for providing plenty of useful content. I have bookmark your blog site and will be without doubt coming back.
ReplyDeleteLeather Skirt alteration Watford
When your favorite outfit doesn’t fit quite right, professional clothing alteration can make all the difference. Whether it’s adjusting the length of a dress, resizing a suit, or repairing everyday wear, skilled tailoring ensures your clothes look and feel perfect.
ReplyDeleteFor those searching for clothing alteration Melbourne, our expert team provides high-quality services tailored to your needs. From simple hemming and zip replacements to complete restyling, we handle every job with precision and care. We understand that well-fitted clothing not only enhances appearance but also boosts confidence.
If you’re looking for cloth alteration near me, our conveniently located service is the solution. With quick turnaround times and affordable pricing, we make it easy to keep your wardrobe in top condition. Trust our experienced tailors to deliver the perfect fit every time.
Clothing alteration is the simplest way to make any outfit look and feel tailor-made. Whether your clothes are slightly loose, too long, or not fitting as they should, professional clothing alteration helps refine the shape, comfort, and overall appearance of your garments. From everyday wear to formal outfits, the right alterations can completely transform how you carry your clothes.
ReplyDeleteOur clothing alteration services cover hemming, waist adjustments, sleeve shortening, resizing, zipper replacement, and detailed tailoring for dresses, suits, trousers, and shirts. Each alteration is handled with care, ensuring the original design and fabric quality are maintained. The goal is simple: a clean, natural fit that matches your body and style.
Well-fitted clothing not only looks better but also boosts confidence. Instead of replacing garments that almost fit, clothing alteration offers a practical and cost-effective solution. Skilled tailoring extends the life of your wardrobe while giving your outfits a polished, professional finish.
Looking for professional clothing alteration in Melbourne that you can trust? Whether it’s resizing a formal suit, adjusting a dress, hemming trousers, or repairing everyday wear, expert tailoring makes all the difference. Quality clothing alteration ensures your garments fit perfectly, feel comfortable, and look sharp for every occasion.
ReplyDeleteIf you have been searching for clothing alteration near me, you want more than just basic stitching. You need skilled hands that understand fabric types, garment structure, and precise measurements. From minor adjustments to complete restyling, professional clothing alteration in Melbourne helps extend the life of your wardrobe while saving you the cost of buying new outfits.
Perfectly tailored clothing enhances your confidence and overall appearance. Whether it’s bridal wear, business attire, school uniforms, or casual outfits, reliable alteration services focus on detail, durability, and clean finishing. Fast turnaround times and affordable pricing also make it convenient for busy individuals.
Looking for professional clothing alteration services that deliver the perfect fit every time? Our expert team specializes in high-quality clothing alteration in Melbourne, offering precise adjustments for all types of garments. Whether you need hemming, resizing, repairs, or complete restyling, we provide reliable and affordable cloth alteration near you.
ReplyDeleteWe understand that every piece of clothing alteration is important, which is why our experienced tailors pay close attention to detail to ensure flawless results. From everyday wear to formal outfits, our clothing alteration Melbourne services are designed to enhance comfort, style, and confidence.
Searching for “cloth alteration near me” shouldn’t be a hassle. We offer quick turnaround times, competitive pricing, and personalized service to meet your needs. Whether it’s adjusting a dress, tailoring a suit, or repairing damaged clothing, we are your trusted choice for professional alterations.
Wonderful explanation of the topic
ReplyDeleteReally helpful information, thanks for sharing.
ReplyDelete