What I Wore Sunday {AND} A Flower Embellishment Tutorial Sort of Thing
A Happy Mother's Day to you!!!

Today, I'm joining in another fun link-up and, of course, throwing a little bit of sewing into the mix! So without further ado...
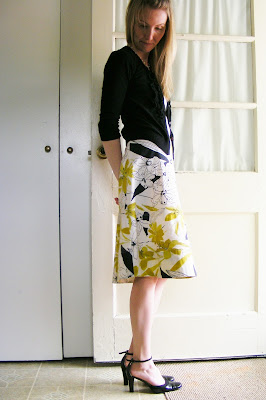
In honor of this cold and beautiful Mother's Day, I dolled up in this outfit for church:

Shoes first. I wore some Anne Kleins purchased at full price from Marshall Fields circa 2002. Haven't worn those puppies in ages! But it *is* a very special day, right?

On top, I wore one of my wardrobe staples -- a black button-up sweater by Merona from Target (last year). I have two of these. LOVE THEM. Sadly, it is difficult to see the ruffly goodness in photo form.


Today, I'm joining in another fun link-up and, of course, throwing a little bit of sewing into the mix! So without further ado...
In honor of this cold and beautiful Mother's Day, I dolled up in this outfit for church:

Shoes first. I wore some Anne Kleins purchased at full price from Marshall Fields circa 2002. Haven't worn those puppies in ages! But it *is* a very special day, right?

On top, I wore one of my wardrobe staples -- a black button-up sweater by Merona from Target (last year). I have two of these. LOVE THEM. Sadly, it is difficult to see the ruffly goodness in photo form.

The necklace is an old one of un-remembered origin and the tank came from from Banana Republic circa 2005. The skirt literally arrived on my doorstep last week. It was a secondhand gift (yay for free!) and made by a brand called Elevenses?

Voila!
Now, one of the interesting details that I love about this skirt is a fabric flower on the side front.

See? How cute! Totally something you could make and put on a skirt or sweater or child's sundress or something. I tried it out and without too much fuss, here's what I came up with:

I'm kind of calling this a tutorial, but mostly I'm gonna give you the dimensions, list of stuff you need, and the process I used. Stick around if you are a sewing sort of person, otherwise, skip on down to the bottom.
To start, here is the anatomy of the flower:

Here are the materials I used:
* 3/4 inch button
* four pieces of fabric at least 8.5 x 1.75 inches, and one piece of fabric at least 7 x 1.75 inches (read through before cutting)
* a scrap of fabric big enough to cover the button x 2

1) I started with the button. I cut out two circles of fabric bigger than the button, like in the picture above -- one piece out of my printed fabric and one piece of white for a lining. Using a whip-stitch, I gathered the fabric around the button and cut off the extra fabric to make the back of the newly-covered button as flat as possible.


2) Next, I made the fabric ribbon for the flower and tails.

You can make the fabric ribbon sewing one long piece of fabric and then cutting it apart into the correct sizes, but I only had scraps, so I just found enough fabric to make what I needed: four ribbons 8.5 inches long and one ribbon 7 inches long. (The finished ribbon needs to be 5/8" wide which means your fabric scrap/strips must be at least 1.75" wide.)
Instead of cutting the fabric in advance to sew the ribbons, I took my scrap of fabric, folded it over (inside out), and then sewed a seam 5/8 inches away from the fold. Then I trimmed off the extra fabric 1/4 inch away from the seam. (It's a faster method. Be careful not to trim too close to the seam, or the seam might pop open when you try to turn it right-side-out.)


Curious why there's a string hanging out? I used the trick of stringing a piece of cording into the fold while I sewed. What you do is tack down one end of the cord (securely so that it doesn't pull out) and then gently pull on the loose end until the whole piece is turned right-side-out.

After it was turned, I removed the cord and pressed the ribbon with the seam in the center back.
3) To make the flower, I cut three pieces of ribbon 8.5 inches long each. This is how I started putting the flower together, BUT! Afterward I thought of a better way, so stay with me...


Don't do that! Instead of sewing one set of loops at a time like I did, stack all three 8.5" pieces on top of each other and tack them together in the middle. Then sew all of the raw ends to the middle to make the loops. Here, I have a somewhat embarrassing paint shop illustration:

Does this make sense? Tack the middle and then fold the raw ends back to the center.
Anyway, once all of my loops were made using a more squirrely method, I sewed on the two tails -- one 8.5" and one 7" long. I tucked in the raw edges to finish off the loose ends:

Finally, I sewed the button onto the front. Delightfully satisfying.

4) To give the flower a bit of height and pizzazz, fluff it a little before you attach it to something. A bit of bunching in the loop department goes a long way.

Cuteness, yes? I'm adding this flower to my little bag of sewing tricks. Do you have a repertoire of sewing embellishments? Ya never know when you might need and extra something to take your sewing project to the next level!
Thank you for stopping by and thanks to Fine Linen & Purple for hosting! For more WIWS fun, do head here and click around. Maybe join in next week...

I LOVE your button-up sweater!! That would be a staple in my closet, too. :) Great job re-creating the flower. I like the fabric you chose--it would be a super cute addition to a little girl's skirt.
ReplyDeleteThanks! I agree about the little girl's skirt. Kids can totally rock that kind of stuff.
DeleteBeautiful outfit! The skirt and shoes are my favorite part. And I love the flower tutorial!
ReplyDeleteBlair, thanks! And thanks for stopping by :o).
Delete