The Couch Slipcover
Hello good friends! My apologies for the lack -- Oh shameful lack! -- of content here at the Chipper. Forgive me? Today I have something really exciting to share.
My couch! I finally slipcovered it. It may or may not have taken four months from start to finish. ;)
Please excuse the photography! Apparently it is difficult to photograph a large piece of furniture located in front of the only significant light source in a room.
That said...................where to begin?
Well, let's take a look at what I had to work with, shall we?
Also featured is T-Rex, our anatomically-correct dino figure. We noticed too late.
Yes, that's ballpoint pen.
|
This couch is the love child of two different couches. We bought the original the month before we got married and now we have four children and are about to celebrate our eleventh anniversary. Enough said.
Once the floral cushions entered the scene, the couch wore a ready-made hand-me-down cover.
Clearly the cover was a huge improvement over said love-child-couch, but it was more than a challenge to keep all locked and loaded. It generally looked like it had been trampled by a small herd of elephants. This may have drove me nuts.
BUT, I didn't want to take on a huge slipcover project. Eeek. How many hours would it take? I looked for a different couch. My wallet yelled at me. Eventually I ended up with two options: Buy a used couch or recover mine. Might as well stick with the dirt we know, right?
As for the design and fabric...
I chose cotton canvas because it's cheap and washable. There aren't that many options when it comes to cheap slipcover fabric. I had a moment of regret after I purchased it -- I wished I had sprung for bull denim like this.
What you see here is 70" wide "natural" cotton canvas from the regular old fabric store. For my 85" long couch with five cushions, 19 yards proved to be plenty.
Would I buy it again? Yes and no? I probably should have gone for a heavier weight fabric. I do like the texture and the casual look. It washes without wrinkling like crazy and the fabric loses it's yellowish tint with washing. Notice how the seat cushion on the right in the next picture looks darker? It was the last one made and hasn't been washed as many times as the other covers
On a side note, I am sorely disappointed with the drop cloth canvas used on this chair. It positively absorbs dirt and stains.
:: The Makings ::
Not being any kind of expert on this type of sewing, I'll just share various pictures of the making and throw in a few observations.
Serging appears to be essential to slipcover making. These fabrics really do shred in the wash. One of the reasons why I know this is because, in an epic parenthood moment, one of my children puked on the half-made cover.
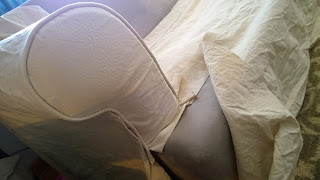
This last picture is a good illustration of what I think is one of the hardest parts of slipcovering -- figuring out what to do with the seam allowances. There are all sorts of strange angles where you can't sew down the seam allowance or it will skew the fit.
Instead of draping the fabric on the couch and then cutting it, I measured all of the major pieces and cut them out with generous seam allowances (at least 2 inches). This enabled me to cut with the grain and work with straight edges and squared corners.
This last picture shows the spot where I put the Velcro opening on the back of the couch. Originally I had planned for two openings but one did the trick.
Because of the very sorry state of my couch, I went ahead and cut the old cording right off of the couch arm rest. Better fit for the new cover.
As you can see, the mesh covering the couch springs shredded a long time ago. I used to cover the holes with thin foam and a folded flat sheet but stuff still fell into there. G.R.O.S.S. Thankfully that's not a problem anymore.
One of the reasons why I didn't do anything fancy with the lower portion of the front of the couch is that I felt like I didn't have the time or mental capacity to work out fancy pleats. Plus, I wasn't sure how it would impact washing -- would I have to press out the pleats in order for it to look okay?
I wish I had sprung for a pleat or three anyway.
Recovering the back cushions turned out to be a pleasurable experience. The seat cushions? Not so much. They were really hard! After the first one, it took about four months to set aside the time and energy to take on the second one. And it doesn't even match the first one in size and shape, but you didn't hear that from me.
The most satisfying part of the process was definitely ripping out the old batting and covering the foam with new batting and a nice clean inner cover (made out of cut-up mattress protectors). The cushions are finally looking and feeling more fresh.
 |
| Notice again the color difference between the newer cushion on the right. A few more washings and it should match. |
Perhaps, on a clean day, this blog will get updated with a full-room picture :o). For now, here is the before and after:
Victory.
Oh wait! I forgot to tell you about the "blanket" in the last picture.
It's not a blanket.
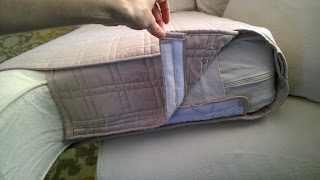
The cover is a twin quilt I bought at Meijer that I chopped up and turned into a removable, fitted seat cover. I figured I'd end up throwing a blanket on the "nice" couch to protect it. Might as well factor that in and eliminate the irritation of straightening a blanket.
I made the cover tight which means it's a real pain to get on and off, but it looks tidy and hopefully it will extend the life of my seat cushion fabric. Not to mention, it eliminates that food-magnet-middle-cushion-crack. Though I kind of miss tucking my feet between the cushions. :)


BRAVO!!!!!
ReplyDeleteBRAVO!!!!!
ReplyDelete